How to Transfer Money from ICICI Bank to GIFT City - Step-by-Step Guide
You've done your homework on GIFT City investments. The tax-free USD fixed deposits look appealing. But now you're staring at your ICICI Bank app, wondering: "How exactly do I get my money there?"
If you have an ICICI Bank account, the process is simpler than you think.
Their Money2World feature lets you transfer funds to your GIFT City FD account directly from your phone. No branch visits. No physical paperwork. Just a few taps and your money is on its way to earning tax-free returns in USD.
Many NRIs in our WhatsApp community had questions about this exact process. This guide walks you through each step with real screenshots from the iMobile app.
What You'll Need Before Starting
Gather these items before you begin:
- iMobile Pay app (latest version) or ICICI Internet Banking access
- Active ICICI Bank account (Savings, NRE, or NRO)
- Your GIFT City bank account details including account number, SWIFT code, and branch address
- PAN card linked to your ICICI account
- Registered mobile number for OTP verification
👉 Tip: Don't have a GIFT City account yet? Belong can help you open one with partner banks like RBL, ICICI GIFT City, or Axis Bank GIFT City. Our app handles the paperwork digitally from anywhere in the world.
Understanding ICICI Bank's Money2World Feature
Money2World is ICICI Bank's outward remittance platform. It operates under RBI's Liberalised Remittance Scheme (LRS), which allows resident Indians to transfer up to USD 250,000 per financial year for permitted purposes.
Here's why ICICI's platform works well for GIFT City transfers:
Feature | Details |
|---|---|
Availability | 24/7 through iMobile app |
Transaction Limit | Up to USD 75,000 per transaction |
Currencies | 21 currencies including USD |
Tracking | Real-time SWIFT GPI tracking |
For NRIs transferring from an NRE account, there's no upper limit. From NRO accounts, you can transfer up to USD 1 million per financial year with proper documentation. (Source: ICICI Bank)
Step-by-Step: Transferring Money from ICICI Bank to GIFT City
The process has two parts. First, you'll add your GIFT City account as a receiver. Then, you'll initiate the transfer. Adding the receiver is a one-time setup.
Part A: Setting Up the Transfer
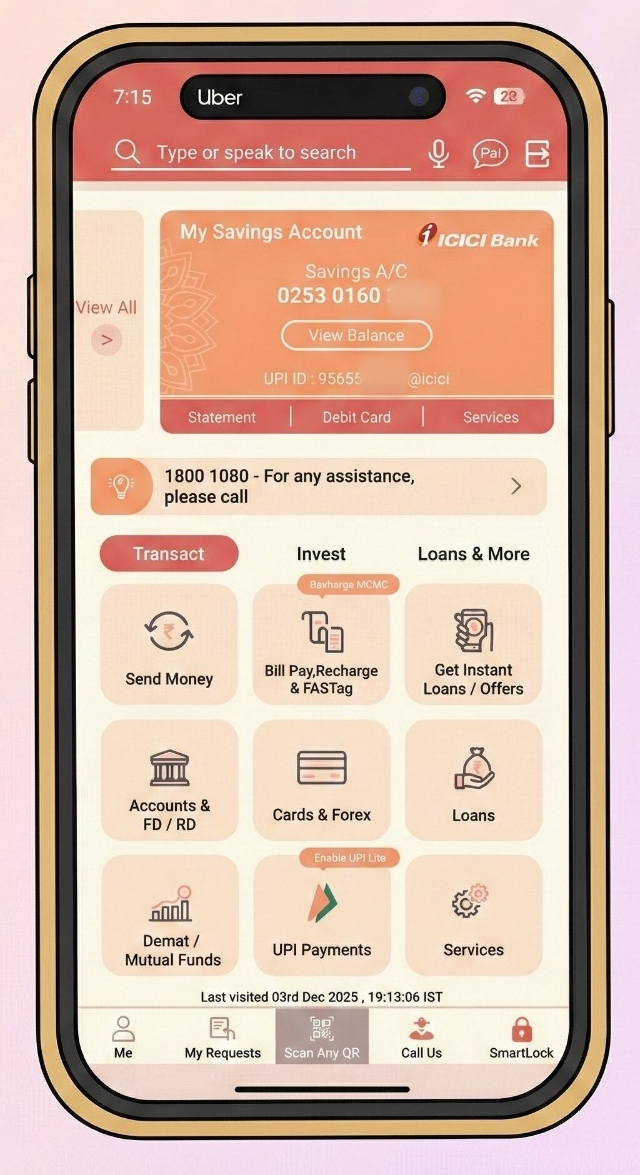
Step 1: Open iMobile and Go to Send Money
Log into your iMobile Pay app. On the home screen, you'll see various options. Tap on 'Send Money' under the Transact section.
This opens ICICI's payment options. You can see recent transactions, manage payees, and access the overseas transfer feature.
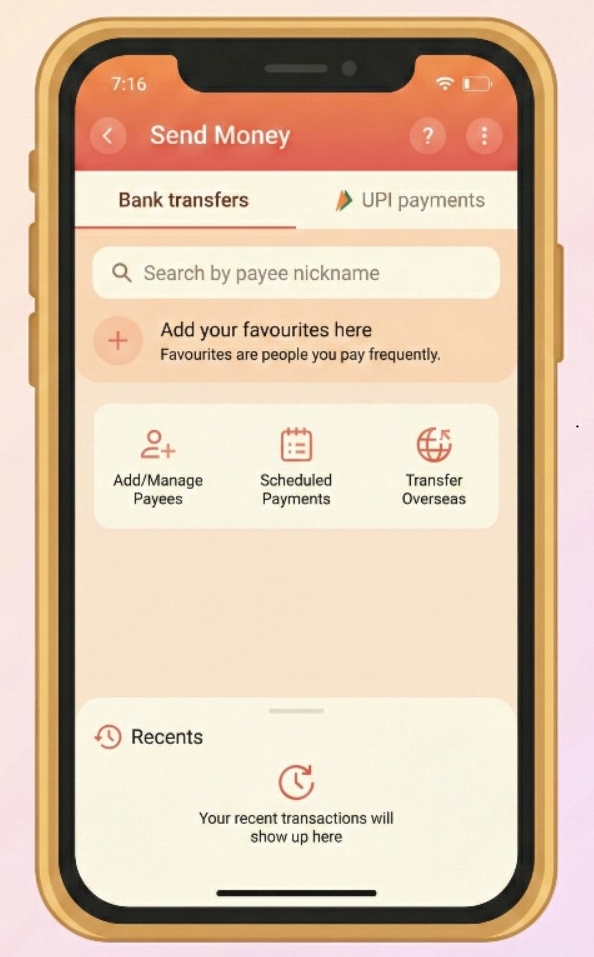
Step 2: Select Transfer Overseas
On the Send Money screen, you'll see three main options: Add/Manage Payees, Scheduled Payments, and Transfer Overseas.
Tap on 'Transfer Overseas'. This redirects you to ICICI Bank's Money2World service.
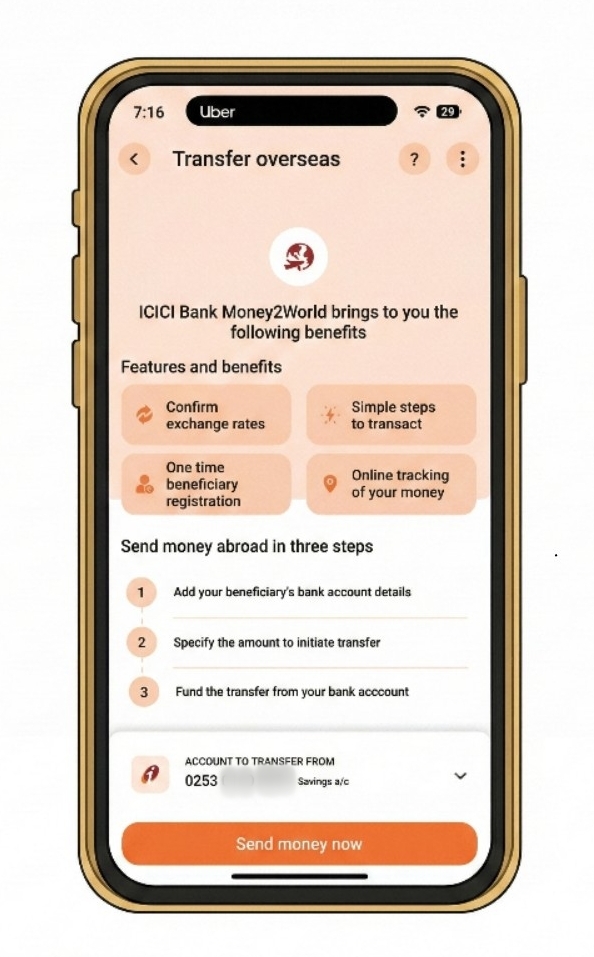
Step 3: Start the Money2World Process
The Money2World welcome screen explains the key benefits: confirmed exchange rates, one-time beneficiary registration, simple steps to transact, and online tracking.
You'll also see your account number from which funds will be debited.
Tap 'Send money now' to proceed.
👉 Tip: Requests submitted before 2 PM IST on working days are processed the same day. After 2 PM or on weekends, they process the next working day.
Part B: Entering Transfer Details
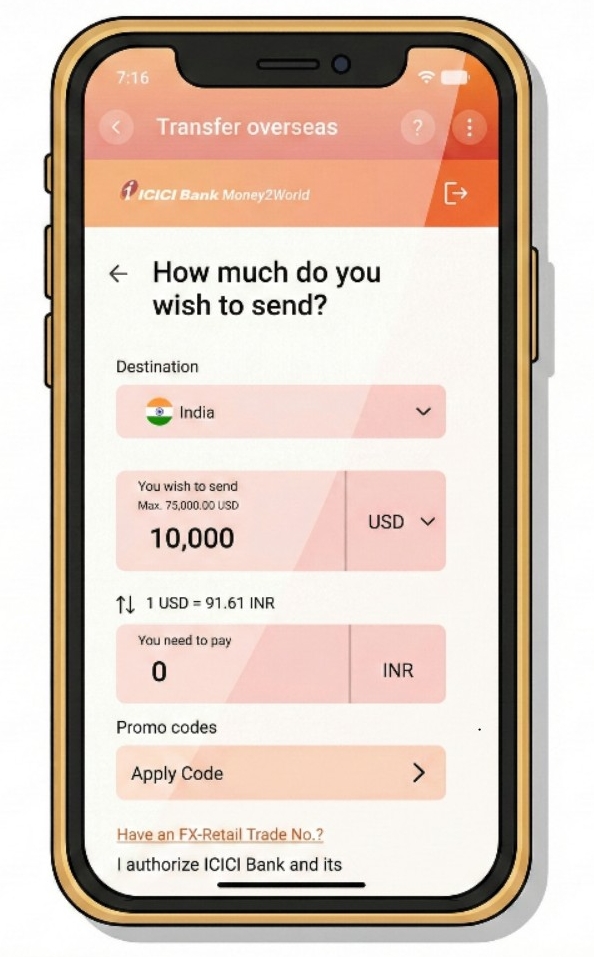
Step 4: Enter the Amount and Select Destination
Now you'll specify how much you want to send.
- Destination: Select India (yes, GIFT City transfers go to India since it's located in Gujarat, though treated as an offshore financial zone)
- Currency: Choose USD
- Amount: Enter the amount you wish to send
The screen shows the live exchange rate. In our example, 1 USD = 91.61 INR.
You can also apply promo codes if available.
Step 5: Review Exchange Rate and Total Cost
The app displays a complete breakdown:
- Amount you wish to send (e.g., 45,805 INR)
- Remittance service charge (e.g., 750 INR)
- GST on charges (e.g., 135 INR)
- GST on currency conversion (e.g., 82.44 INR)
- TCS (Tax Collected at Source) if applicable
The total amount to be debited from your account will be shown clearly.
About TCS: For transfers above Rs 7 lakh per financial year, TCS of 5% applies (20% for non-educational purposes above Rs 10 lakh). This is refundable when you file your income tax return.
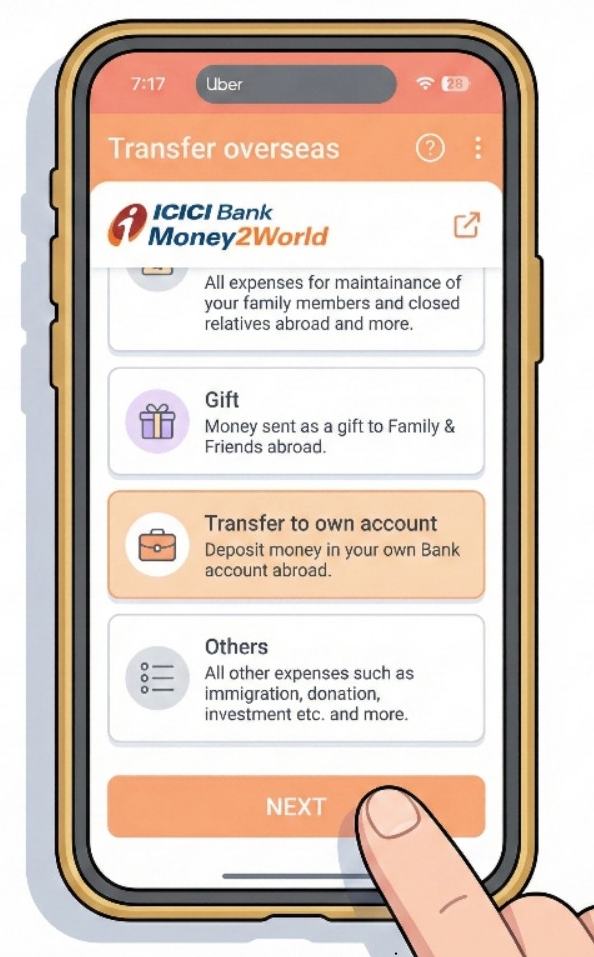
Step 6: Choose the Reason for Transfer
ICICI asks: "What is the reason for your transfer?"
Select 'Transfer to own account' since you're sending money to your own GIFT City bank account.
Other options include family maintenance, gift, and others. Each has different documentation requirements.
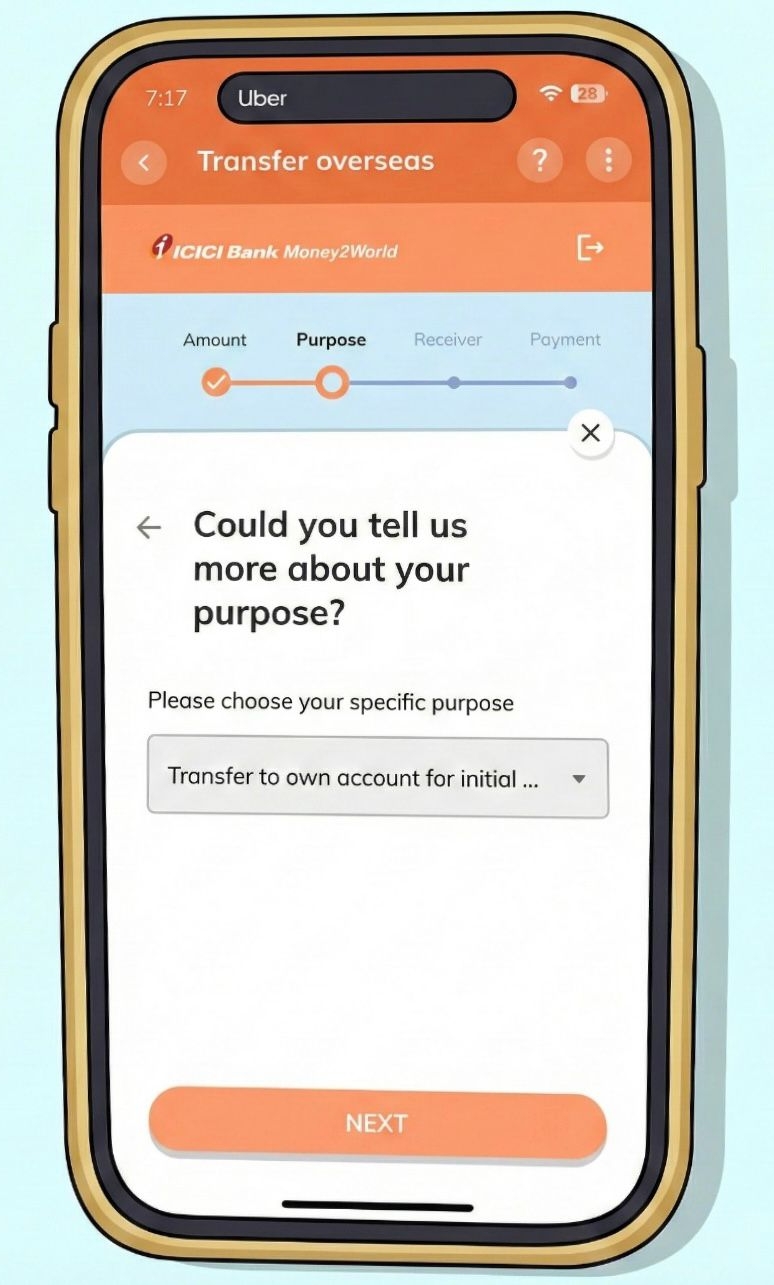
Step 7: Select the Specific Purpose
A dropdown appears asking for more details. Select 'Transfer to own account for initial…' or the appropriate purpose code.
This corresponds to RBI's purpose codes for LRS transactions. For GIFT City investments, this is typically S0023 (Transfer to own bank account overseas).
Step 8: Confirm GIFT City Transfer
Here's the important part. The app recognizes you're transferring to GIFT City and shows a confirmation popup:
"Confirm on IFSC GIFT City transfer"
"This payment will be transferred to IFSC GIFT City in Gandhinagar, Gujarat, India. Would you like to confirm and proceed with the transaction?"
Tap 'CONFIRM' to continue.
![[Screenshot: GIFT City confirmation popup]](https://prod.superblogcdn.com/site_cuid_clx4a3rx6000caheo10zipfw1/images/8-1768270966351-compressed.jpeg)
👉 Tip: This confirmation step is unique to GIFT City transfers. ICICI has specifically enabled this pathway, making transfers smoother than with some other banks.
Part C: Adding Receiver Details
Step 9: Add a New Receiver
If this is your first transfer, you'll need to add your GIFT City bank account as a receiver.
The app asks: "Who would you be sending this money to?"
Tap 'Add new' to register your GIFT City account.
![[Screenshot: Add new receiver screen]](https://prod.superblogcdn.com/site_cuid_clx4a3rx6000caheo10zipfw1/images/9-1768270991000-compressed.jpeg)
Step 10: Categorize the Receiver
Select how to categorize this receiver. Since you're transferring to your own account, choose 'My Bank Account'.
This tells ICICI that both sender and receiver are the same person, which simplifies documentation.
![[Screenshot: Receiver category selection - My Bank Account]](https://prod.superblogcdn.com/site_cuid_clx4a3rx6000caheo10zipfw1/images/10-1768271015387-compressed.jpeg)
Step 11: Enter Your GIFT City Bank Details
This is the most critical step. Enter your GIFT City account information accurately:
- SWIFT Code: Enter your GIFT City bank's SWIFT code (e.g., RATNINB2XXX for RBL Bank GIFT City)
- Bank Name: The system will auto-populate this (e.g., RBL BANK LTD)
- Branch: GIFT CITY
- Country: India
- Account Number: Your GIFT City account number
![[Screenshot: Bank details entry screen]](https://prod.superblogcdn.com/site_cuid_clx4a3rx6000caheo10zipfw1/images/11-1768271038561-compressed.jpeg)
Common GIFT City Bank SWIFT Codes:
Bank | SWIFT Code |
|---|---|
RBL Bank GIFT City | RATNINB2XXX / RATNINBBGFT |
ICICI Bank GIFT City | ICICINAAXXX |
Axis Bank GIFT City | AXISINBBGIF |
👉 Tip: Double-check the SWIFT code! An incorrect code can delay your transfer by days. If you opened your account through Belong, you can find these details in the app itself.
Step 12: Intermediary Bank Details (Optional)
The app asks: "Do you wish to provide Intermediary Bank Details?"
For most GIFT City transfers, select 'NO'. Direct transfers to GIFT City banks typically don't require an intermediary.
If your GIFT City bank has specifically provided intermediary bank details, select YES and enter them on the next screen.
![[Screenshot: Intermediary bank popup]](https://prod.superblogcdn.com/site_cuid_clx4a3rx6000caheo10zipfw1/images/12-1768271067555-compressed.jpeg)
Step 13: Add Intermediary Bank Details (If Required)
If you selected YES, enter the intermediary bank's SWIFT code, name, and address.
Most NRIs transferring to major GIFT City banks can skip this step.
![[Screenshot: Intermediary bank details entry]](https://prod.superblogcdn.com/site_cuid_clx4a3rx6000caheo10zipfw1/images/13-1768271089236-compressed.jpeg)
Step 14: Enter Receiver Address
Provide the receiver's address. Since you're the receiver, enter your own address as registered with the GIFT City bank.
- Country: India
- Address: Your address (e.g., your residential address in India or the GIFT City bank's address)
- Zip code: Enter the appropriate pin code
![[Screenshot: Receiver address entry]](https://prod.superblogcdn.com/site_cuid_clx4a3rx6000caheo10zipfw1/images/14-1768271110819-compressed.jpeg)
Step 15: Verify with OTP
ICICI Bank sends a 6-digit verification code to your registered mobile number.
Enter the OTP to confirm adding the new receiver. The code expires in about 2 minutes.
This security step ensures only you can add beneficiaries to your account.
![[Screenshot: OTP verification screen]](https://prod.superblogcdn.com/site_cuid_clx4a3rx6000caheo10zipfw1/images/15-1768271133007-compressed.jpeg)
Part D: Completing the Transfer
Step 16: Specify the Source of Money
An important compliance step. Select where your money is coming from:
- Salary/Savings
- Business income
- Sale of assets
- Gift/Inheritance
The screen shows an important note about TCS: "TCS (Tax collected at source) of 20% would be applied to all international remittances over a threshold of Rs 10 lakh made within a fiscal year."
Select your applicable source and proceed.
![[Screenshot: Final payment confirmation with OTP]](https://prod.superblogcdn.com/site_cuid_clx4a3rx6000caheo10zipfw1/images/16-1768271213445-compressed.jpeg)
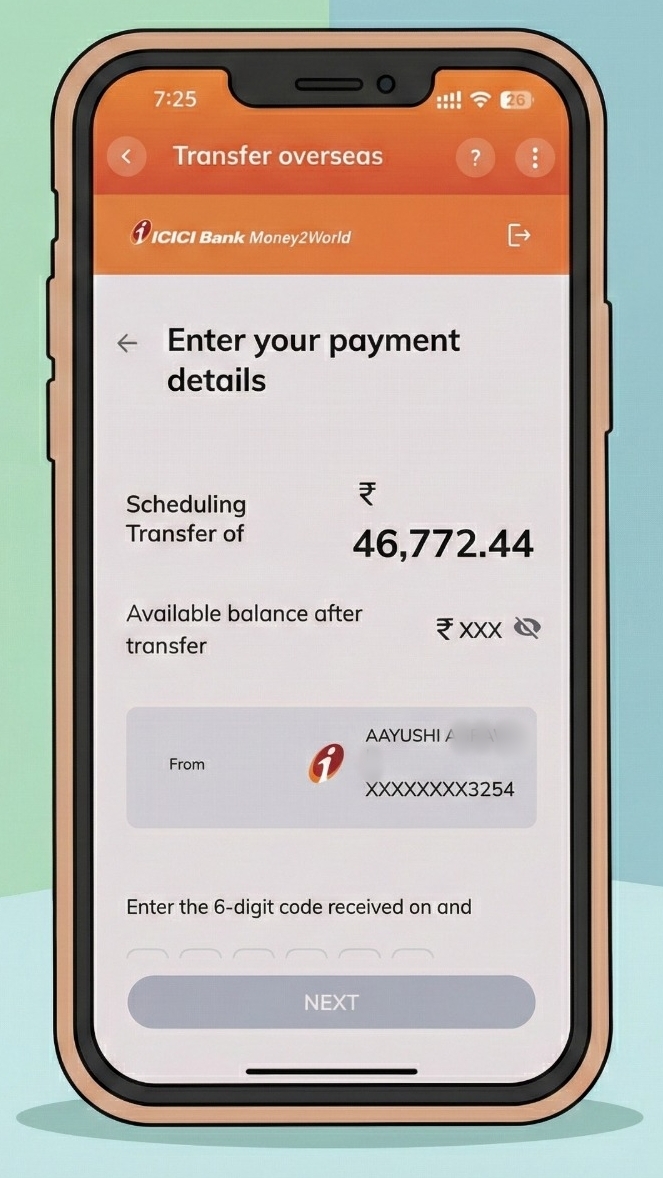
Step 17: Final Confirmation and Payment
Review all details one last time:
- Transfer amount in INR
- Available balance after transfer
- Source account details
Enter the 6-digit OTP received on your registered mobile/email to authorize the payment.
![[Screenshot: Source of money selection with TCS note]](https://prod.superblogcdn.com/site_cuid_clx4a3rx6000caheo10zipfw1/images/16-1768271164548-compressed.jpeg)
Step 18: Transfer Initiated
Once you confirm, the transfer is initiated. ICICI Bank will:
- Debit the total amount from your account
- Convert INR to USD at the locked exchange rate
- Send the funds via SWIFT to your GIFT City account
You'll receive an email with the SWIFT reference number for tracking.
Expected Timeline: Funds typically reach your GIFT City account within 1-3 working days.
Understanding the Costs
Here's a breakdown of what you'll pay for an ICICI to GIFT City transfer:
Cost Component | Amount |
|---|---|
Remittance Service Charge | ₹500-750 + GST |
Currency Conversion Margin | Built into exchange rate |
Correspondent Bank Charges | Usually nil for GIFT City |
TCS (if applicable) | 5-20% above ₹7 lakh/year |
The TCS is not an extra cost. It's an advance tax collection that you can claim as a credit when filing your ITR.
👉 Tip: Check if ICICI is running any promotional offers. They occasionally waive service charges for Money2World transfers.
Why Transfer to GIFT City? The Real Advantage
Let me share why many NRIs in our community are moving funds to GIFT City:
Feature | NRE FD (Rupee) | GIFT City USD FD |
|---|---|---|
Currency | INR | USD |
Interest Rate | 6.5-7.5% | 4.5-5.5% |
TDS in India | Tax-free for NRIs | Tax-free |
Currency Risk | Exposed to depreciation | Protected |
Repatriation | Fully repatriable | Fully repatriable |
The rupee has depreciated roughly 4-5% annually against the dollar over the past decade. With a GIFT City USD FD, you earn interest AND benefit from this trend when you convert back to rupees.
Use Belong's Rupee vs Dollar Tracker to see historical currency trends before deciding.
What Happens After the Transfer?
Once your transfer is processed:
- Tracking: Check transfer status in Money2World under 'View Details'
- Confirmation: ICICI sends an email when funds reach the beneficiary
- In GIFT City: Log into your GIFT City bank account to verify receipt
- Book FD: Once funds arrive, you can book a USD Fixed Deposit
If you opened your GIFT City account through Belong, you can track your balance and book FDs directly through our app.
Troubleshooting Common Issues
Transfer stuck in processing? Check if all KYC documents are in order. ICICI may request additional verification for first-time large transfers.
Wrong SWIFT code entered? Contact ICICI customer care immediately. They may be able to recall the transfer if it hasn't been processed.
TCS deducted but you're an NRI? TCS rules apply based on your residential status in the source bank's records. Ensure your NRI status is properly updated with ICICI. You can claim TCS refund when filing returns.
Transfer amount different from what you entered? Exchange rates fluctuate. The final credited amount depends on the rate at the time of processing, not when you initiated the transfer.
Ready to Start Your GIFT City Investment?
Transferring from ICICI Bank to GIFT City is straightforward once you know the steps. The Money2World feature handles the regulatory compliance, and GIFT City's special status means your funds arrive in a tax-efficient offshore zone within India.
My suggestion: start with a smaller amount to test the process. Once you're comfortable, scale up. That's what many NRIs in our community did before making larger transfers.
Need help opening a GIFT City account?Download the Belong app to get started with our partner banks. We handle the KYC and setup digitally. Plus, use our free NRI FD comparison tool to find the best rates across NRE, NRO, FCNR, and GIFT City deposits.
Have questions about GIFT City transfers? Join our WhatsApp community where many NRIs share their experiences and get answers from our team.
Sources
- ICICI Bank - Money2World Outward Remittance
- ICICI Bank - Outward Remittance FAQs
- ICICI Bank GIFT City FAQs
- RBI - Liberalised Remittance Scheme Guidelines
- IFSCA - Banking Regulations
Related Articles
- GIFT City Fixed Deposits for NRIs
- GIFT City vs NRE/NRO/FCNR: Which FD is Right for You?
- Best NRI Fixed Deposit Rates
- GIFT City Tax Benefits for NRIs
- How to Invest in India from UAE
- Transfer Money from IDFC First Bank to GIFT City
- ICICI Bank for NRIs in UAE
- Best Banks for NRI Accounts
- NRI Account Types Explained
- Repatriable vs Non-Repatriable NRI FDs

Comments
Your comment has been submitted